Take your glow to a new high with the Green Goddess makeup trend. This 90’s inspired look is surely making a huge comeback, and we are here for it. Few beauty trends have stood the test of time as well as the trusty smoky eye, but there’s no reason why this signature look can’t benefit from a modern twist! We worked with makeup artist Jaybee, to share a simple step by step, tutorial (see video below) Plus Green eye-shadow on dark skin is ALWAYS a win!

MAGIC STEP 1: Prep your skin with primer. Primer use not only blurs your pores and smoothens your skin, but also helps decrease the production of oils throughout the day. The use of primer for face makeup also brightens your skin and refines its texture, this helps in achieving a smooth makeup application.
MAGIC STEP 2: Apply airbrush flawless foundation for a flawless-looking complexion.
MAGIC STEP 3: Prime your eyes with a molten bronzer. This will create a flawless canvas upon which your other products will sit beautifully. If you’re prone to oily eyelids, take a little of the product onto that area too.
MAGIC STEP 4: Enhance and define your gaze. Create a subtly sun-kissed glow by using a Powder Brush to blend the Pressed Bronzer into your hairline, cheeks, the bridge of your nose, your chin, jaw and neck.
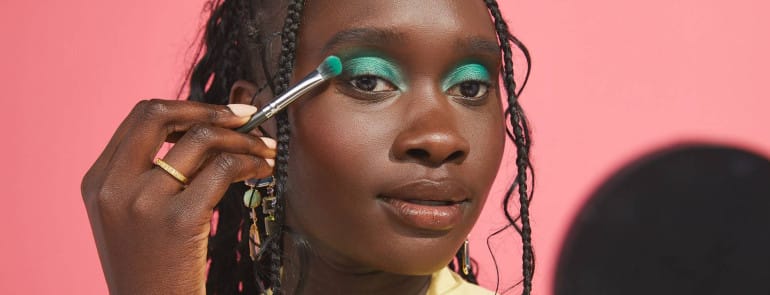
MAGIC STEP 5: Transform and smoke! Using the fluffy end of the eyeshadow brush, tap the eyeshadow into your eyelid crease, building up a subtle contour. Open your eye occasionally to ensure the product is visible, adding more if needed.

MAGIC STEP 6: Add a pop with gold and colour. Use the fluffy end to apply a stunning khaki-green shade with a light shimmer, all over your eyelid. Patting the product into your skin with small, precise motions will minimise the amount of fallout. Bring the colour onto the lower lash line, then gently blend together.
MAGIC STEP 7: Line to define. Glide gel eyeliner across your waterline, then onto your upper lash line to create a subtle, smoky wing deepening the colour to your desired intensity.
MAGIC STEP 8: Give your gaze an irresistable flutter. Take your eyeshadow onto the angled end of the same brush and go over the liner on both your lower and upper lash lines.Top off the drama and impact of your eye look with eyelash extensions. Apply mascara to your upper lashes. Finally, go back in with a final coat of mascara to set the fibres in place.

MAGIC STEP 9: Give yourself a linitless glow. To apply, switch your brush around the outer shade and tap off any excess product before sweeping the color from the apple of the cheek upwards toward the top of your cheekbone. Then pop your brush directly into the middle shade, making sure to tap off the excess, and apply to the apples of your cheeks to make them pop and glow! Blend the two shades seamlessly together for a dreamy pop of peachy pink magic!
MAGIC STEP 10: Get a smooth, flawless-looking finish. Set your makeup in place using a Finish powder. Apply using the Powder & Sculpt Brush to your t-zone for a smooth, poreless, flawless looking finish!
MAGIC STEP 11: Perfect your pout. This look yearns for an understated lip, so go in with a lip liner and nude lip colour to give your pout a naturally fuller appearance and a gentle sheen of colour.